contents
Scratch遠隔センサーとESP8266
2016年12月24日(土) CoderDojo Nara

むとうたけし(@610t)
発表資料はここから

ざっくりいうと…
- Scratch 1.4には、遠隔センサーという機能があります。
- ネットワーク経由で、入出力が可能です。
- 遠隔センサーの実例として、AndroidとESP8266でデモします。
Scratch Remote Sensor Protocol
Scratch Remote Sensors Protocol (遠隔センサープロトコル) は、ネットワーク経由でScratchと情報をやり取りするためのプロトコルです。
Scratch側では、TCP42001で遠隔センサーからの接続を待ち受けします。
パケットの構成
<size: 4 bytes><msg: size bytes>
- 4バイトのパケットサイズヘッダ
- メッセージ
- broadcast "msg"
- sensor-update "var1" value1 "var2" value2 ......
broadcast
メッセージを送ります。
- Scratch→センサー: [msgを送る]と「broadcast "msg"」が送られる
 →broadcast "btn"
- センサー→Scratch: 「broadcast "msg"」を送ると、msgイベントを受け取る
broadcast "btn"→
sensor-update
すべてのスプライト用変数の値の変更をおこなう。
- センサー→Scratch: sensor-updateを受け取ると、変数の値を更新する。
sensor-update "h" 29 "t" 27 "btn" 0 → 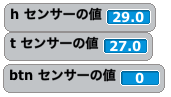
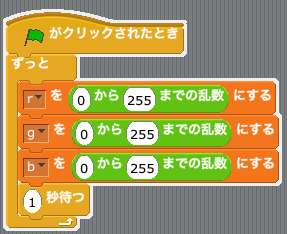
- Scratch→センサー: 全てのスプライト用変数の値が更新された時に、sensor-updateを送る。
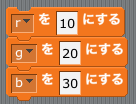 →sensor-update "r" 10 "g" 20 "b" 30
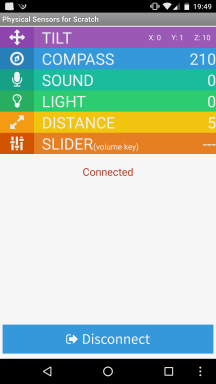
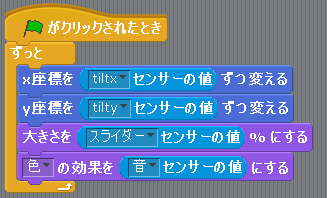
デモ: Physical Sensor for Scratch
- Physical Sensor for Scratchを使って、Androidから遠隔センサー
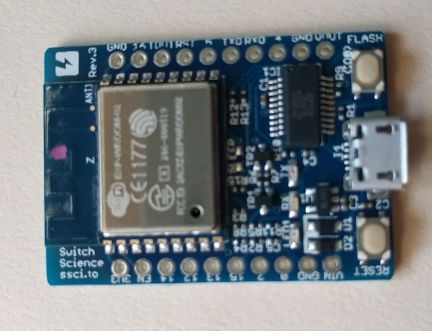
ESP8266
- ざくっというと、Arduino+WiFi(無線LAN)
- 日本では、ESP-WROOM-02がメジャー。
- 各社から製品が出ています。
- ESPr Developer(2160円)がおすすめ
ScratchとESP8266
ScratchからWifiで遠隔操作してみる: Scratch 遠隔センサープロトコルの実装例
- ScratchにWiFi経由で接続する
- ESP8266 4番ピンのスイッチの値によって、変数vを更新(sensor-update "v" 0 or 1)
- この時、メッセージmも送る(broadcast "m")
無線LAN関連コード
 #include <ESP8266WiFi.h>
const char* ssid     = "PUT SSID HERE";
const char* password = "PUT PWD HERE";
const char* host = "PUT PC IP ADDRESS HERE";
const int Port = 42001;
void setup() {
  WiFi.begin(ssid, password);
  while (WiFi.status() != WL_CONNECTED) {
    delay(500);
  }
}
void loop() {
  WiFiClient client;
  if (!client.connect(host, Port)) {return;} // fail
  (snip)
        if (client.write((const uint8_t*)scmd, 4 + strlen(scmd+4))) {
  (snip)
}
メッセージ関連コード
void loop() {
  (snip)
    if(digitalRead(4)!=sw) {
      sw=digitalRead(4);stat=1;
      strcpy(scmd+4,"broadcast \"m\"");
    } else {
      if(stat==1) {
        stat=0;
        if(digitalRead(4)==LOW) {
          strcpy(scmd+4,"sensor-update \"v\" 0 ");
        } else {
  (snip)
    scmd[3]=(uint8_t)strlen(scmd+4); // scmd[3]はコマンド長
    if(0!=strlen(scmd+4)) {
      for(uint32_t i = 0; i < 4 + strlen(broadcastcmd); i++) {
        if (client.write((const uint8_t*)scmd, 4 + strlen(scmd+4))) {
        } else {
  (snip)
デモ: ESP8266⇔Scratch
- ESP8266→Scratch
- ESP8266のD3ボタンを押すと、"button"メッセージが飛んで、状態が変数btnに。
- 温度・湿度センサーの値を、変数t,hとして送る

- Scratch→ESP8266: 変数r,g,bで、RGB LEDを制御する。
まとめ
- Scratch 1.4の、遠隔センサープロトコルについて説明しました。
- AndroidとESP8266からScratch遠隔センサーを使ってみました。
Scratch 1.4 is still alive!!!
おまけ
- Scratch 1.4で、ArduinoをPicoBoardとして使うこともできます: Scratch+Arduino
- Scratch 2では遠隔センサーは使えませんが、拡張機能があります: PicoBoard, LEGO WeDo 1.0 & 2.0
- ScratchXでは、もっと色々な拡張機能があります。
Last modified: 2016-12-24
Post-it: New Post-it (help)